 Brickaizer -
Help Brickaizer -
Help |
Brickaizer -
Help
Tutorial for Combos
Combos are stacked bricks. The
most common combination is a round 4073 brick on top of the square 3024
flat 1-stud brick.
The
colour combinations you can make this way are almost endlessly. Some examples
are shown below. On the left you see the original combo combinations, on the
right you see the blended colours as are used in the application. These blended colours are
used for a normal mosaic engine. In case of the Mosaic Pro engine the
real colour distribution of the library picture is used (so: left in the picture
below). This is generally more accurate. Now you are not stuck to the standard colour
palette of brick any more...
. There is
a downside however. The colour distribution
is not equal over the brick, not blending very well in colour. The
centre colour is always dominant, while the edges are different. For large
colour differences of the top and bottom bricks the effect can be too prominent.
Slight differences between top and bottom brick are the best, like the ones that
are marked with the white dot (picture
above).
A second word of caution is to
avoid huge amounts of combinations. The reason is that the application may
select many colours, leading to a huge effort to create these colour
combinations, where just a few are required in the mosaic. It's better to
limit yourself to a limited amount of good blending combos, and the ones you
also have plenty of in stock. To make a mosaic with more than 100 different
combinations is quite a task, and may not always lead to the expected
result.
Lesson 1: Make your database of
Combos This is by
far the most cumbersome part of the tutorial. To make the database you first need
to inventorise which combinations and colours of the combo bricks you have available
(here we assume you will use the 3024 and 4073 bricks), then you need to
choose which colour combinations are looking good, and blend very well. The best
blend is usually achieved with transparent 4073 bricks. Some combinations of
non-transparent combinations will also work. Combinations with a transparent 3024
may be possible but are not recommended to avoid that the base plate colour
will bleed into the colour impression. There is one important
first rule that must be followed to make the database work: the file
naming. The make sure the data of each combined brick is correctly derived from
the Bricklink database you must follow this rule of file
naming:
<colour name square
brick>+<colour name round brick>_<Bricklink colour ID square
brick>+<Bricklink colour ID round brick>_<any other identity
you like to add><.bmp>
You should now specify the
words between the < > characters but without these < >
characters. Please make sure you add the + and the _ characters. These are
required in the application to search the colour name string and colour # to
connect to the Bricklink data. The brick data is derived from the Bricklink
database, not from the colour of the picture. The colour of the picture is of
course used to construct the mosaic. We strongly recommend to save each picture
in the uncompressed .bmp format to keep the quality as high as
possible.
Examples: Dark
Blue+Trans-Yellow_63+19_JDFCombo.bmp and Trans-Yellow+Trans-Orange_19+98_JDFCombo.bmp
A second rule is: the picture
must be 60 x 60 pixels in size. The reason is that the application uses
this 60 pixel value to determine how many studs are in the picture. For instance
if you would add a 60x120 pixels picture is assumes that this is a 2x1 stud
brick. In case of combos the limitation is that only 1x1 studs can be used here.
Hence the rule of 60x60 pixels in size.
With help of Jeremy, user and inspiration
for developing the Brickaizer application, we have selected a database of 290 different
colour combinations. Still too many to make use of, but we can keep the amount
to a maximum. The picture below shows all the pictures (!), although
quite small. When this selection is made, then create a picture
library. Press the 'Picture library'
button and follow the instructions. In case
you want to know the details: here
you can find more information on how to create a
picture library. Lesson 2: Make your first Combo
mosaic This is
by far the simplest part of the tutorial. Basically press the 'Create mosaic' button. But
before doing so we selected a good picture that works well with Combos. The
picture should really be colourful, and with many subtle colours and preferably
a wide colour range. As can be seen from
the
above colour library, we have plenty of reds, yellow, greens
and blues, but just a few browns and greys. So, we have selected a
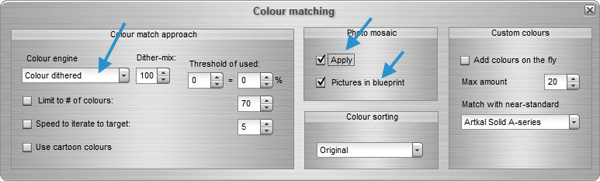
source picture that requires these colours. The settings are important. We have chosen to apply the
mosaic engine of Mosaizer Pro, and use the actual pictures to rebuild the
mosaic. We also choose the colour dithering to improve the overall colour
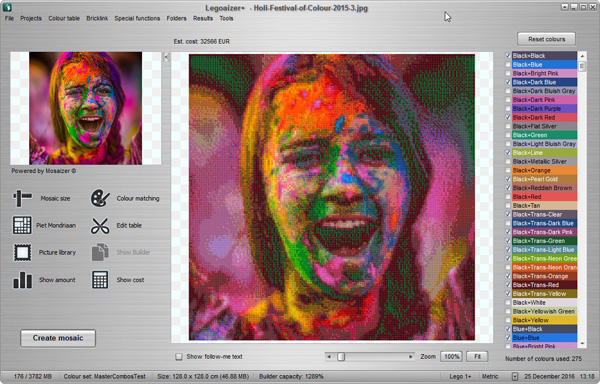
impression. These settings are shown below. The results are quite good. The real added value of
combos is shown here: many small patches of a variety of (bright) colours, not
so much (large) areas of the same colour. That kind of mosaics would be
better to make with normal bricks. When we enlarge a part of the mosaic, you can clearly see
how the combination of base and top brick works: the greens are very subtly
created, from bright green (almost lime) to yellowish green, and bluish
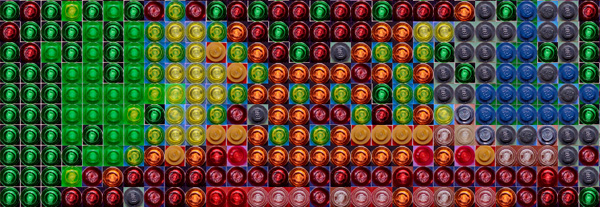
green. To show how the result would be achieved with the default
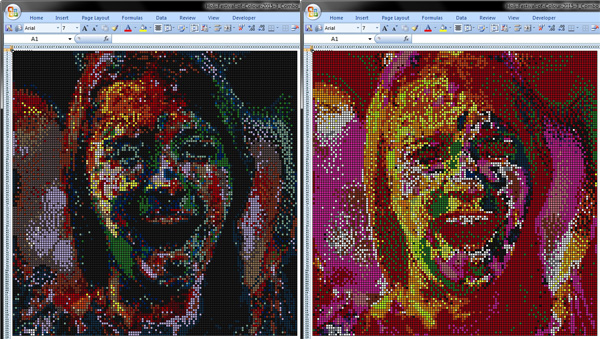
Bricklink database (picture below): not bad but definitely not sparkling. Lesson 3: Create
a building blueprint for your
Combo
The combo
has two layers, each has its own building blueprint. To output this
data you should either check the option 'Save output as
excel' in the 'Preferences' pop-up window
(automatic save), or use the manual 'Save mosaic
as...' option in the main menu ('File'
). This will create the blueprint spreadsheet (as a normal mosaic), but now having two
tabs, one for each layer. When the (default) output is opened (e.g. via the menu
'Results' > 'Open saved
Spreadsheet') you will now only
find the data of the two layers, and not see the combined result. To see
the final result
you need to open the blueprint bitmap, which is saved along with the spreadsheet. The two
spreadsheets look like the picture below: left the
lower layer, right the top layer.
The
colours in the above shown spreadsheet are usually not the
exact colours of the individual bricks. This is a
simple
limitation of using spreadsheets with representative, but averaged, RGB colour values,
and real pictures that are more natural in colour impression. Nevertheless, the two spreadsheets
are useful to build your combo-mosaic. Alternatively you can also create building output as a
.pdf file. First select via the menu 'File' >
'Print special' and select the size of the output (usually 32x32
stud base plates). In this case we have 4x4 base plates of 32
studs, one for the top and one for the bottom layer. The output then looks as
follows: Epilogue: What else
is there to do? 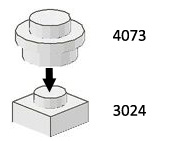

![]() and
and ![]() where 'Trans-Yellow' has the Colour ID of 19 in the Bricklink
database (entry #86, don't confuse these numbers).
where 'Trans-Yellow' has the Colour ID of 19 in the Bricklink
database (entry #86, don't confuse these numbers).

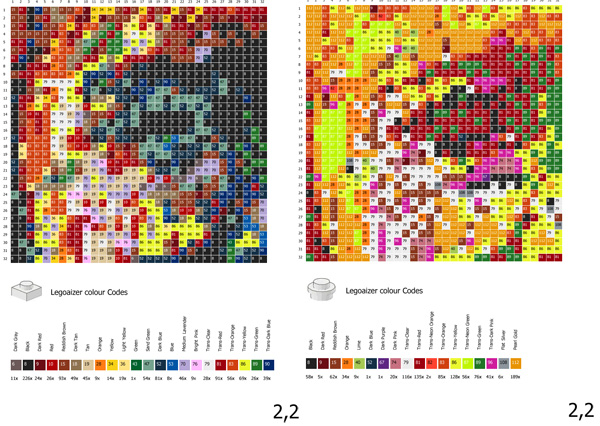
Here you
see similar output as the excel version: left the square bottom brick layer,
right the same area for the round top bricks. At the bottom of each
.pdf page you also find the amount of bricks you need for that part of the
mosaic. Very practical if you want to build this mosaic with a team of
people.
Basically you can play around with every
setting that you can do with any normal mosaic, with
or without real pictures.